
How to Tell if Your DMM is Hi-Z or Lo-Z (and Why It Matters in the Field)
Most digital multimeters used by electricians are high impedance (Hi-Z). That’s great for accuracy, but it can display phantom/induced voltage on floating conductors. A meter with a true low impedance (Lo-Z) voltage function intentionally loads the circuit so weak coupled voltage collapses—helping you separate “meter readings” from a circuit that can deliver hazardous energy.
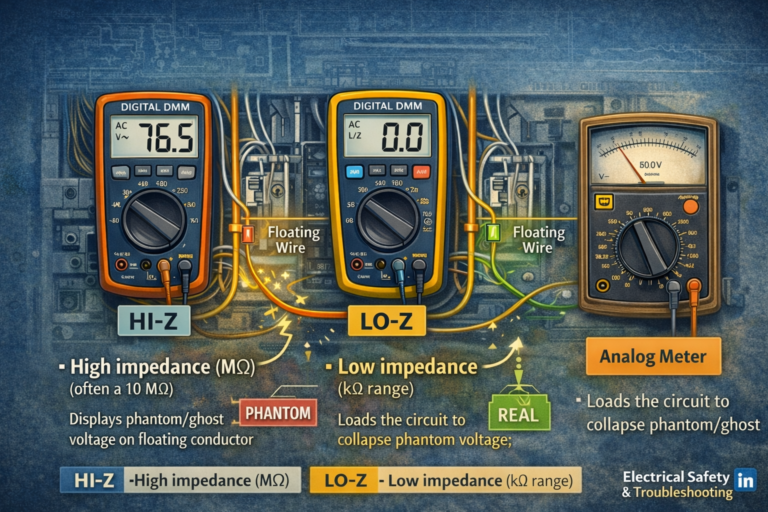
🧠1) What “Hi-Z” and “Lo-Z” Actually Mean
Input impedance is the resistance your meter presents to the circuit when measuring voltage. The higher the impedance, the less current the meter draws from the circuit.
| Term | Typical input impedance | What it does in the real world |
|---|---|---|
| Hi-Z DMM (most meters) | Often ~10 MΩ (may vary by range/mode) | Minimal loading; can display coupled/phantom/induced voltages on floating conductors |
| Lo-Z voltage mode (some meters) | Much lower than Hi-Z (varies by design; commonly in kΩ range) | Loads the circuit; weak induced/phantom voltage collapses; persistent voltage suggests real source/backfeed |
📄2) Fastest Way: Check the Meter’s Specs (The Right Line to Look For)
The most reliable answer is in the manufacturer documentation. You’re looking for either:
- “Input impedance” for voltage ranges (V AC / V DC)
- A dedicated function labeled “LoZ”, “Low Impedance”, “Low Z”, or similar
| What you see in the manual/specs | What it indicates | What to do next |
|---|---|---|
| “Input impedance: 10 MΩ” (for V ranges) | This is a standard Hi-Z DMM (normal behavior) | Use a Lo-Z method (if available) to check for phantom/induced voltage during troubleshooting |
| A separate dial position/button labeled “LoZ” | Meter has an intentional low impedance voltage function | Learn how to enable it and when to use it; it is not always default |
| “Input impedance varies with range” or “>10 MΩ” | Still Hi-Z for normal voltage; may change by mode (e.g., VFD/LPF) | Confirm behavior in the field using the controlled tests below |
🎛️3) Dial & Button Clues: What to Look For on the Meter Itself
Many electricians never notice Lo-Z because it can be a secondary function. Use these clues:
| Marking / behavior | What it usually means | Field confirmation |
|---|---|---|
| Dial position says “LoZ” or “V~ LoZ” | Dedicated low-impedance voltage test mode | Compare same point in V mode vs LoZ mode; ghost voltage should collapse in LoZ |
| A soft-key toggles “LoZ” on the screen while in V mode | LoZ is a selectable sub-function | Ensure LoZ icon is actually active before trusting the result |
| No LoZ anywhere; only standard V ranges | Likely a standard Hi-Z DMM only | Use a two-pole tester/approved Lo-Z method for “ghost” elimination |
🧪4) Field Confirmation Tests (No “Guessing” Required)
The goal is to perform a controlled comparison between Hi-Z and Lo-Z behavior. You don’t need to know the exact impedance number to confirm whether the meter is acting as Hi-Z only or has a Lo-Z mode.
Test A — “Floating conductor” comparison (common in buildings)
- Identify a known floating conductor (example: an open switch leg/traveler in a box, with an adjacent energized conductor present).
- Measure to equipment ground using your standard V mode (likely Hi-Z). Note the reading (often 20–90V in real scenarios).
- Now measure the same exact points using Lo-Z (if your meter has it) or using an approved low-impedance tester.
-
Interpret results:
Reading collapses substantially in Lo-Z → confirms the voltage was largely coupled (phantom/induced).
Reading remains stable → treat as real source/backfeed until isolated and proven otherwise.
Test B — Load/bleed check (diagnostic concept)
Lo-Z functions act like a built-in “bleeder/load.” If your meter is Hi-Z only, the reading may remain because the meter itself is not discharging the coupled energy. In Lo-Z mode, the meter provides that discharge path and the voltage tends to collapse quickly.
🧭5) Testing Ghost/Phantom Voltage with an Analog Meter (When You Don’t Have Lo-Z)
A traditional analog (needle) voltmeter can be a powerful tool for distinguishing phantom/induced voltage from a real energized/backfed source. The reason is simple: many analog meters present a lower input impedance than a modern digital meter in standard V mode, so the meter itself provides circuit loading that collapses weak coupled energy.
Analog meter field procedure (practical and repeatable)
- Verify the meter on a known live source (or proving unit) before starting.
- Select the proper AC volts range (start high, then step down as needed) to avoid pegging the needle.
- Measure the suspect conductor to a known reference point (equipment grounding conductor or bonded enclosure).
-
Watch the needle:
Phantom/induced: needle barely deflects or decays toward zero.
Real/backfed: needle produces a firm, repeatable deflection that does not collapse. - Re-verify the meter on the known live source (or proving unit) after testing.
⚡Why This Matters Under NFPA 70E (Practical Implications)
When verifying absence of voltage, a Hi-Z DMM can display voltage on a conductor that is not capable of delivering meaningful current. If voltage persists under a Lo-Z method (or is stable and repeatable), treat it as a real source/backfeed until isolated.
🧾Quick Checklist: How to Identify Hi-Z vs Lo-Z in 60 Seconds
| Check | What you’re looking for | What it means |
|---|---|---|
| Manual/spec sheet | Input impedance listed for V ranges; any LoZ function mentioned | 10 MΩ indicates Hi-Z; LoZ indicates a selectable low-impedance mode exists |
| Dial markings | “LoZ” / “V~ LoZ” printed on dial or screen | You have a true Lo-Z function (when selected) |
| Display icon | LoZ indicator appears when engaged | Lo-Z is active; without the icon you may still be in Hi-Z mode |
| Field comparison | Same point reads high on V mode but collapses on LoZ | Confirms coupled/phantom voltage is being displayed in Hi-Z mode |
© Educational content. Always follow NFPA 70E, your company electrical safety program, and the instrument manufacturer’s instructions.